Install and Configure Squid on Ubuntu Server
In this tutorial, we will learn how to install and configure the squid proxy and caching server on Ubuntu Linux. The term proxy is generally combined with two different terms, one is forward proxy and the other is reverse proxy.
Most of the time when we talk about proxy it generally refers to forward proxy. A forward proxy server works on behalf of clients and hide the client IP address from the internet.
A reverse proxy server is the exact opposite of a forward proxy server. Reverse proxy server is worked behalf of the server and protects servers from the outside world.
Today we are going to configure forward proxy on Ubuntu using Squid3. To install and configure Squid on Ubuntu Server 16.04, we have to take the following steps:
- Install the squid3 package.
- Configure web caching.
- Configure Access Control List(ACL).
We can easily install Squid as usual from the Ubuntu software repositories. Open the command line and install squid3 package.
sudo apt-get update
sudo apt-get install squid3
Open the /etc/squid/squid.conf file:
sudo vim /etc/squid/squid.confUncomment the cache_dir directive to add a disk cache directory:
cache_dir ufs /var/spool/squid 100 16 256
Restart the Ubuntu squid server:
systemctl restart squid.serviceSquid server by default listens to TCP port 3128, So Make sure that you have allowed the TCP port 3128 on your firewall.
The default cache size is 100MB. To change cache size edit the cache_dir directive. The following example sets squid cache size to 500MB:
cache_dir ufs /var/spool/squid 500 16 256Control Access to the Ubuntu Proxy server with Access Control List (ACL)
You can limit users’ ability to browse the Internet with access control lists (ACLs). by default, the Ubuntu Squid.conf file is configured with ACL lines that will deny access to everything except the localhost. So now we need to set the list of IP addresses allowed to use squid.
Following example will allow IP address 192.168.1.10 to connect to the internet through the proxy server.
Add the following line at the bottom of the acl section of /etc/squid/squid.conf (under the TAG: acl):
acl allow_clients src 192.168.1.10
Then, add the following line at the top of the http_access section of the /etc/squid/squid.conf (under the TAG: http_access):
http_access allow allow_clients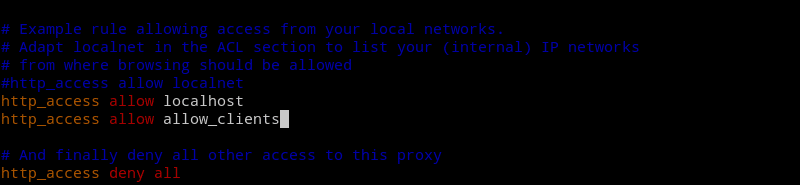
Finally, Restart the squid server:
systemctl restart squid.serviceIn the above example, we added IP address 192.168.1.10 to the ACL group called allow_clients.
Then, we enabled http access to the allow_clients group.
Now the client with IP address 192.168.1.10 can browse the internet through the Ubuntu proxy server.
You can add multiple IPs to the ACL group as follows:
acl allow_clients  src 192.168.1.10/24
acl allow_clients  src 192.168.1.11/24
Manage Squid Proxy Server
You can manage squid on Ubuntu with systemctl command. To view server status, Type:
systemctl status squidTo start the squid service, Type:
sudo systemctl start squidSet squid server to start at system reboot (default):
sudo systemctl enable squidRun netstat command to make sure that the squid is listening on port 3128:
sudo netstat -tulnp | grep 3128Summary
In this tutorial we learned squid proxy server configuration in Ubuntu step by step.
- We start by installing the Squid3 package on Ubuntu.
- Once the squid3 is installed, we edit the configuration file to enable web caching by uncommenting the cache_dir directive.
- Then, we learned how to control access to the proxy server with Access Control List (ACL).