How to Install WordPress on Ubuntu Server
In this this lesson I am going to explain how to install WordPress on Ubuntu Server 16.04 with Apache as the Web server.
For this guide, we are going to use www.example.com as our Domain name. To use the example.com domain, we need to add a host record to the hosts file in our personal computer.
192.168.1.105 www.example.com
192.168.1.105 example.com
In Linux and Unix hosts file is '/etc/hosts', In Microsoft Windows hosts file is 'C:\Windows\System32\drivers\etc\hosts'.
Following are the steps you need to follow in order to Install WordPress on Ubuntu Server 16.04.
- Install Lamp Stack on Ubuntu Server.
- Create MySQL Database and MySQL User.
- Download WordPress.
- Create WordPress Main configuration File.
- Create Apache Virtual Host.
- Run WordPress Installer.
Install Lamp Stack on Ubuntu Server
Following sets of command will Install Apache, MySQL and PHP on your Ubuntu Server 16.04.
apt-get update
apt-get install apache2
apt-get install php7.0 php7.0-mysql libapache2-mod-php7.0
apt-get install mysql-server
apt-get install phpmyadmin
Next, we need to create MySQL Database and User account for the WordPress.
Create MySQL Database and MySQL User for WordPress
WordPress needs MySQL Database and MySQL user who has privileges to the Database. You can easily create the Database and User from the phpMyAdmin. I will show how it is done from the MySQL Console.
I will create a Database called "ubuntu_wordpress" and user called 'wp_user' with 'wppass' as the Password.
First Log in to the MySQL Console:
mysql -u root -pCreate the database and MySQL user account:
CREATE DATABASE ubuntu_wordpress;
CREATE USER 'wp_user'@'localhost' identified by 'wppass';
GRANT ALL PRIVILEGES ON ubuntu_wordpress.* TO 'wp_user'@'localhost';
FLUSH PRIVILEGES;
Download WordPress Latest Version
Next, Download WordPress Latest version with the wget command:
wget https://wordpress.org/latest.tar.gzExtract the tar file to /var/www directory:
tar -zxvf latest.tar.gz -C /var/www/This will extract WordPress to the /var/www/ directory. Inside the '/var/www/' directory, you should have a new folder called wordpress. We will rename the folder to 'example.com'.
cd /var/www/
mv wordpress example.com
This is going to be the DocumentRoot of our Website.
Create WordPress Main configuration File
Main configuration file of the WordPress is 'wp-config.php' file. There is a sample file called wp-config-sample.php in the example.com folder. Rename it to 'wp-config.php'.
cd /var/www/example.com/
mv wp-config-sample.php wp-config.php
Open the wp-config.php file, Then add the Database Configurations as shown below:
/** The name of the database for WordPress */
define('DB_NAME', 'ubuntu_wordpress');

/** MySQL database username */
define('DB_USER', 'wp_user');

/** MySQL database password */
define('DB_PASSWORD', 'wppass');
Create Apache Virtual Host
Now let's create the Apache Virtual Host for the our example.com domain name.
Create a file called example.conf in the /etc/apache2/sites-available/ Directory:
touch /etc/apache2/sites-available/example.confOpen the example.conf file and add following Virtual Host Configuration.
<VirtualHost *:80>
ServerName www.example.com
ServerAlias example.com
DocumentRoot /var/www/example.com/
RewriteEngine On
ErrorLog ${APACHE_LOG_DIR}/example.com.error
CustomLog ${APACHE_LOG_DIR}/example.com.log combined
<Directory /var/www/example.com/>
    AllowOverRide All
    Require all granted
</Directory>
</VirtualHost>
Enable the Configuration file and restart the Ubuntu Apache Web Server:
a2ensite example.conf
systemctl restart apache2.service
We are almost Done.
Run WordPress Installer
Now open the Web Browser and type your domain name on the address bar, you will get WordPress Installation page.
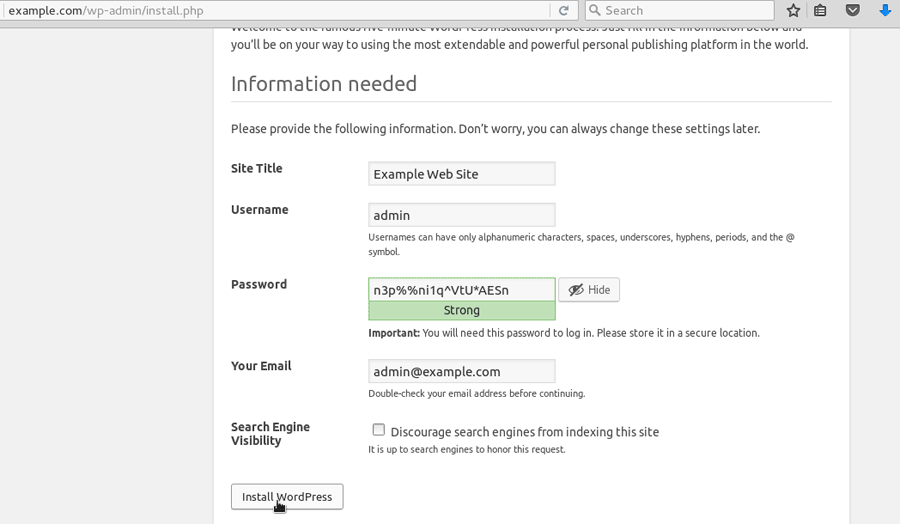
In the Installation page, provide the information as requested and Click on the 'Install WordPress' Button to Finish Ubuntu WordPress Installation.
And We are Done!!!
To go to admin page type 'domain-name/wp-admin'.
www.example.com/wp-adminAdditional Web Server Configurations
Enable Mod Rewrite:
To change the WordPress permalink structure, rewrite Apache module needs to enable in the Ubuntu Server.
a2enmod rewrite
systemctl restart apache2.service
Configure FTP:
To access files on the Web Server, we need to configure FTP Server on Ubuntu. You can read following article to learn how to setup FTP Server on Ubuntu Linux.
After configuring FTP, Create new user with website Document Root as user home directory.
adduser --home /var/www/example.com usernameTo log into the Server you can use a FTP client like FileZilla.
Set File Permission and Ownership:
Owner of the DocumentRoot should be your FTP user while Apache group 'www-data' should be the Group owner:
chown -R ftpuser:www-data example.comFile permission Mode 2755 will give write permission to the owner and read permission to the group.
chmod -R 2755 example.com