How to Enable Hyper-V on Windows 11
Hyper-V is built into Windows 11, and if you have the right edition, you can start running virtual machines without any extra software. In this guide, we'll walk through the requirements, show you how to enable Hyper-V, and cover the basics of Hyper-V networking.
Requirements
Before you enable Hyper-V, your PC needs to meet two requirements:
- Windows 11 Pro, Enterprise, or Education. Hyper-V isn't available on Windows 11 Home.
- Virtualization enabled in your BIOS. This is sometimes called Intel VT-x or AMD-V, depending on your CPU.
Check your Windows edition
- Press
Windows key + R. - Type winver and press Enter.
If you have Windows 11 Home, you’ll have to use either VMware Workstation Pro or VirtualBox. Between the two, I recommend VMware Workstation Pro — it’s also free now and has some advantages over VirtualBox.
Check if virtualization is enabled
- Press
Ctrl + Shift + Escto open Task Manager. - Click the Performance tab.
- Click CPU.
- Look for Virtualization — it should say Enabled.
If it says "Disabled," you'll need to turn it on in your BIOS or UEFI settings. How you do that depends on your motherboard model and CPU, so check your manufacturer's site if you're not sure.
How to Enable Hyper-V
Once your PC meets both requirements, enabling Hyper-V only takes a few clicks:
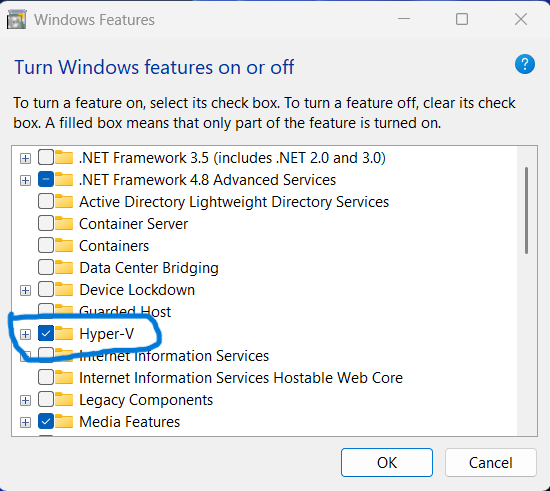
- Press the Windows key, type Turn Windows features on or off, and open it.
- Scroll down and find Hyper-V.
- Check the box next to Hyper-V — this automatically selects Hyper-V Management Tools and Hyper-V Platform as well.
- Click OK.
Windows will search for the required files and install them. When it's done, you'll be asked to restart your PC — click Restart now.
Confirm it's working
After your PC restarts: Press the Windows key, type Hyper-V Manager, and open it.
If it opens and shows your PC name on the left, Hyper-V is enabled and ready to go.
Hyper-V Networking: Virtual Switches
Before you create a virtual machine, it helps to understand Hyper-V networking. To connect a VM to a network, you need a virtual switch. A virtual switch can operate in three different modes.
External switch
An External switch connects your virtual machines to your physical network. VMs can access the internet and talk to other devices on your network — and if you set up port forwarding on your router, you can access your VMs from outside your network too. This is the switch type most people use.
Internal switch
Virtual machines on an Internal switch have their own private network and can communicate with the host PC, but they don't get internet access by default.
There's also a special built-in Default Switch, which Windows creates automatically when you enable Hyper-V. Unlike a regular Internal switch, the Default Switch does give your VMs internet access, since Windows sets up NAT for it behind the scenes.
Use an Internal switch if you want your virtual machines isolated from your physical network but still able to communicate with the host PC.
Private switch
With a Private switch, virtual machines can only talk to other virtual machines connected to the same Private switch. They're completely isolated — no communication with the host, and no internet access. This type is good for isolated test labs.
One more thing worth knowing: you can connect a virtual machine to more than one switch. So you could have one network adapter connected to an External switch, and another connected to a Private switch.
What's Next
Now that Hyper-V is enabled and you understand the three virtual switch types, you're ready to create your first virtual machine. We'll cover that step by step in a separate guide:
- How to Create a Windows 11 VM in Hyper-V