How to Fix VMware Shared Folder Issue on Ubuntu VM (Windows to Ubuntu 24.04 / 22.04)
In this tutorial, we’ll troubleshoot the issue of VMware shared folders not mounting automatically on Ubuntu virtual machines.
I’ll demonstrate this on an Ubuntu 24.04 VM running on a Windows 11 host. But the solution works on any version of Ubuntu — desktop or server — regardless of which operating system you’re using for VMware Workstation (Windows, Linux, etc.).
Step 1: Enable Shared Folder in VMware Workstation
We'll start by sharing a folder from the host machine to the Ubuntu virtual machine.
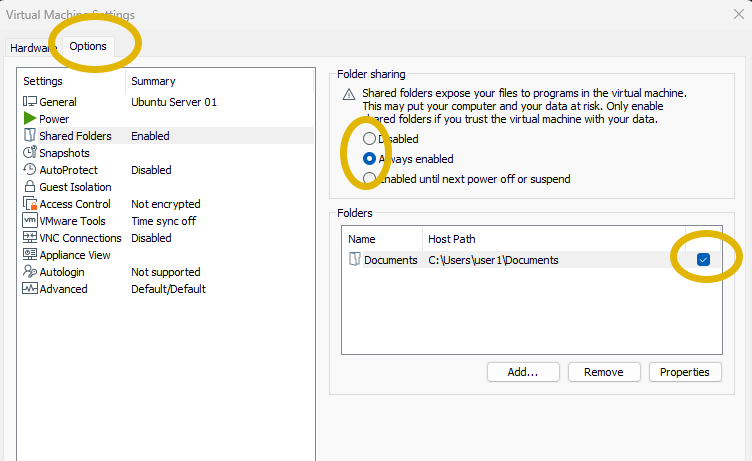
- Right-click the Ubuntu VM and select "Settings."
- In the Settings window, go to the "Options" tab and select "Shared Folders."
- Set the folder sharing option to "Always enabled."
- Click "Add" to choose the folder you want to share from the host machine.
- Make sure the "Enable this share" checkbox is selected.
Step 2: Reboot the Ubuntu Virtual Machine
After enabling the shared folder, reboot your virtual machine. This will help us determine whether the shared folder is mounted automatically at startup.
Step 3: Check if the Shared Folder Gets Mounted Automatically
After the reboot, go to your virtual machine and check the /mnt/hgfs/ directory to see if the shared folder is available.
If it’s not there, follow the instructions in Step 4 to mount the shared folder automatically.
Step 4: Fix Automatic Mounting Using /etc/fstab
First, make sure that VMware Tools is installed. On Ubuntu Server, run the following command:
sudo apt install open-vm-toolsOn Ubuntu Desktop, run the following command:
sudo apt install open-vm-tools open-vm-tools-desktopNext, run the vmware-hgfsclient * command. It should display the list of shared folders you have enabled:
vmware-hgfsclient *Back up /etc/fstab first to avoid problems if something goes wrong:
sudo cp /etc/fstab /etc/fstab.bakNext, open /etc/fstab in a text editor and add the following line at the end of the file:
vmhgfs-fuse /mnt/hgfs fuse defaults,allow_other,_netdev 0 0Make sure there are no syntax errors, then save the file and reboot the virtual machine.
After rebooting, go to the /mnt/hgfs/ directory — you should see all your shared folders there.