How to Clone a VM in Hyper-V (Export & Import Guide)
If you've used VMware Workstation or VirtualBox, you're used to right-clicking a VM and hitting "Clone." Hyper-V doesn't have that option. Instead, you clone a virtual machine by exporting it and then importing a copy. In this guide, we'll clone a Windows 11 virtual machine as an example — the same steps work for any VM in Hyper-V.
Step 1: Export the Virtual Machine
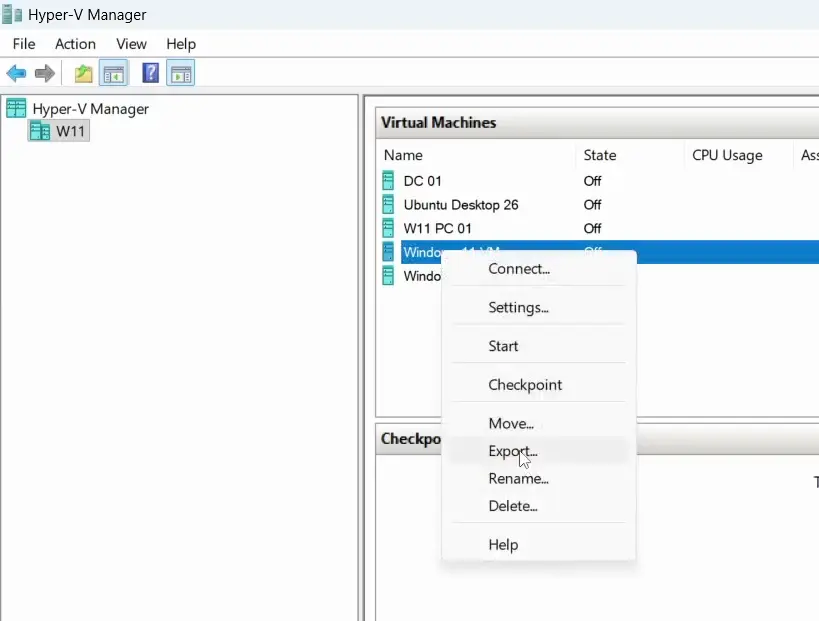
- Open Hyper-V Manager and right-click the VM you want to clone.
- Select Export.
- Click the Browse button and choose a location to save the export files.
- Click Export and wait for it to finish.
Step 2: Import the Exported VM as a Copy
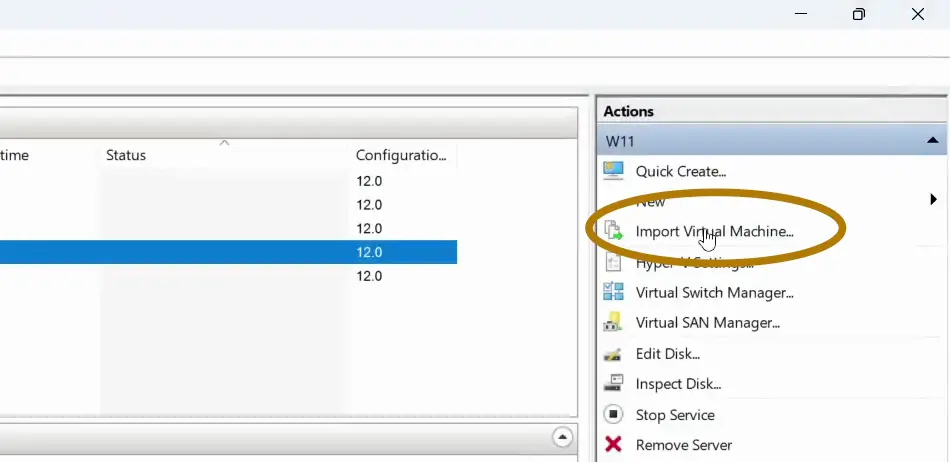
- In Hyper-V Manager, click Import Virtual Machine.
- Click Next, then browse to the export folder you just created.
- Select the folder and click Next — Hyper-V will automatically detect the virtual machine inside it.
- Select the detected VM and click Next.
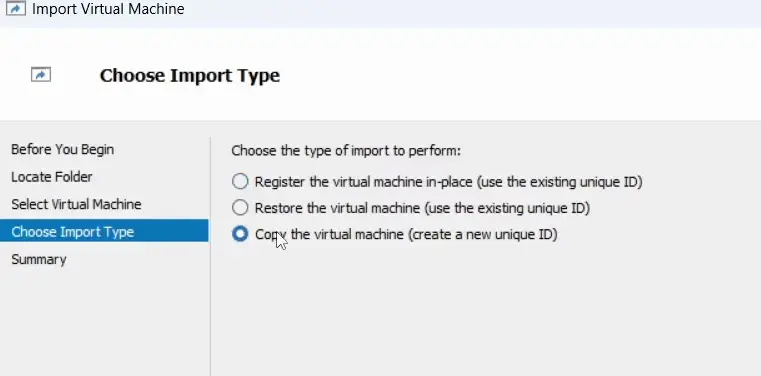
- On the Choose Import Type screen, select Copy the virtual machine (create a new unique ID). This step is essential — it's what actually creates a new, independent virtual machine instead of just reopening the original.
- Click Next.
Step 3: Choose a New Location for the Clone
Don't use the default location here — it will conflict with your original virtual machine.
- Check the box to choose the folders yourself.
- Click Browse and create a new folder for the clone.
- Use this same new folder for all the remaining location prompts, including the virtual hard drive location.
- Click Next, then Finish.
Hyper-V will now create a full clone of your Windows 11 virtual machine.
Step 4: Rename the Clone
The new VM will show up in Hyper-V Manager with the same name as the original, which makes it easy to mix up the two. If you're not sure which one is the clone, check the creation date — the newly imported VM will show today's date.
FAQ
Does Hyper-V have a built-in clone option? No. Unlike VMware Workstation or VirtualBox, Hyper-V doesn't offer a one-click clone feature. You clone a VM by exporting it and then importing the export as a copy.
Why do I need to pick a new location when importing? If you import to the default location, the clone's files can conflict with the original VM's files. Choosing a new folder keeps the two virtual machines completely separate.
How do I tell which VM is the original and which is the clone? Check the creation date in Hyper-V Manager. The clone will show a creation date matching when you ran the import. Renaming the clone right away also helps avoid confusion.
Do I need to shut down the VM before exporting it? Shutting it down first is the safest approach. It's possible to export a running VM, but a clean shutdown avoids any risk of exporting inconsistent data.