Installing PostgreSQL on Ubuntu

In this tutorial, we will learn how to install PostgreSQL on Ubuntu Server. After installing the latest version of PostgreSQL, we will also learn how to connect to the database server using the psql command-line client.
Before we begin, First, you must decide what version of PostgreSQL to install.
As for Ubuntu 20.04 LTS, PostgreSQL 12 is available in the Ubuntu default software repository. And you can install it by running the apt-get install postgresql command. However, it is recommended that you install the latest stable version, that is, PostgreSQL 13.
To Install the Latest Version, We Must First Set Up the Postgres Repository
To set up the Postgres apt repository on Ubuntu, execute the following commands in the terminal:
sudo sh -c 'echo "deb http://apt.postgresql.org/pub/repos/apt $(lsb_release -cs)-pgdg main" > /etc/apt/sources.list.d/pgdg.list'
wget --quiet -O - https://www.postgresql.org/media/keys/ACCC4CF8.asc | sudo apt-key add -
sudo apt-get update
After that, install PostgreSQL with the following command:
sudo apt-get -y install postgresqlYou have now successfully installed PostgreSQL on Ubuntu Linux. To check the installation, you can run the systemctl command, as follows:
sudo systemctl status postgresql.serviceWhen the PostgreSQL server is installed, a new Linux user and a database user, called postgres is created.

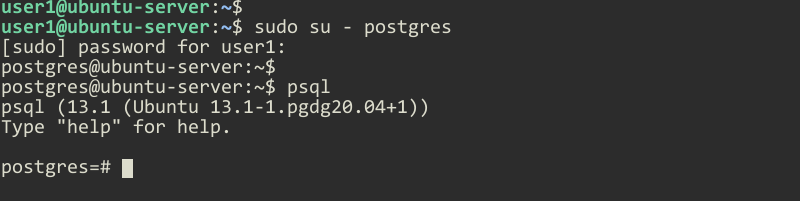
We can connect to the Ubuntu PostgreSQL Server using this user. First, we must switch to the postgres user:
sudo su - postgresThe postgres user does not have a password. Therefore, you need to execute the su postgres command as root (or with sudo). With sudo, When prompted for the password, you should type the sudo password of the current user.
Log in to the psql interactive terminal using the psql command:
psqlType \q or Press Ctrl + D to exit from the psql interactive terminal.
Starting, Stopping, and Restarting PostgreSQL
Administrators can start, stop, and restart PostgreSQL via the systemctl command:
systemctl start postgresql.service
systemctl stop postgresql.service
systemctl restart postgresql.service
Use the enable and disable command options to allow (default) or prevent PostgreSQL starting at system boot on Ubuntu:
systemctl enable postgresql.service
systemctl disable postgresql.service
Default Port, Data Directory and Main Configuration File
The PostgreSQL Server runs on port 5432. You can verify this by running the following command:
sudo ss -tlnp | grep postgresIf you installed PostgreSQL 13 using the Postgres repository, the data directory is set by default to /var/lib/postgresql/13/main. The main configuration file is /etc/postgresql/13/main/postgresql.conf.
If you installed the package provided by Ubuntu, the data directory is set by default to /var/lib/postgresql/12/main. The main configuration file is /etc/postgresql/12/main/postgresql.conf.
Inside the data directory, there is a subfolder named base. It is where the data (databases) are stored in Ubuntu Linux.

In the next tutorial, we will learn how to allow remote access to the PostgreSQL Server.