Install Oracle JDK 9 on Ubuntu and set JAVA_HOME PATH Variable
In this tutorial, we will look at how to install Oracle JDK 9 on Ubuntu Linux and also how to set JAVA_HOME and configure the PATH variable to make the java and javac compiler available from any location within the Ubuntu Terminal.
There are several ways we can Install JDK 9 on Ubuntu, We are going to use the JDK 9 package provides by the Oracle.
Following are the steps you need to follow in order to install Java Development Kit 9 on Ubuntu Linux.
- Download JDK 9 for Ubuntu.
- Extract tar.gz package.
- Configure JAVA_HOME and PATH Variables.
- Set Oracle JDK 9 as default Java version.
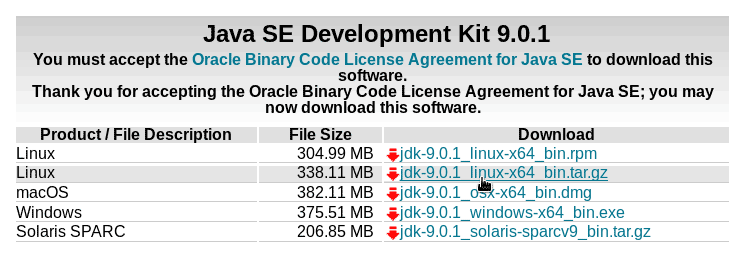
Download JDK 9 for Ubuntu
First step is to download the JDK installation kit from the oracle website. Go to Oracle Java download page and download the Linux tar.gz package for Ubuntu.
Or From the command line you can use the wget command to download the tar.gz file (Make sure to copy the url to the latest version from the oracle website).
wget --no-check-certificate -c --header "Cookie: oraclelicense=accept-securebackup-cookie" https://download.oracle.com/otn-pub/java/jdk/9.0.1+11/jdk-9.0.1_linux-x64_bin.tar.gzExtract tar.gz package
After the download is finished, extract the tar file to the /opt directory.
sudo tar -zxvf jdk-9.0.1_linux-x64_bin.tar.gz -C /opt
In the /opt directory, you should see the Java installation directory. Name of the directory should be something like "jdk-9.0.1" (Depends on the version you downloaded).
Configure JAVA_HOME and PATH Variables
Next, we need to set JAVA_HOME environment variable and add JAVA_HOME to the PATH variable.
Open /etc/bash.bashrc file in any text editor like nano, vim or gedit and add the following lines at the end:
export JAVA_HOME=/opt/jdk-9.0.1
export PATH=$PATH:$JAVA_HOME/bin
Save and source the /etc/bash.bashrc file to apply the new changes:
source /etc/bash.bashrcSet Oracle JDK 9 as default Java version
We need to set Oracle JDK 9 as the default Java version in our Ubuntu Server. We do this by using the update-alternatives command.
First add the Oracle java 9 and javac compiler to the alternatives:
sudo update-alternatives --install "/usr/bin/java" "java" "/opt/jdk-9.0.1/bin/java" 1
sudo update-alternatives --install "/usr/bin/javac" "javac" "/opt/jdk-9.0.1/bin/javac" 1
Then, set Java Development Kit 9 as the default Java version:
sudo update-alternatives --set "java" "/opt/jdk-9.0.1/bin/java"
sudo update-alternatives --set "javac" "/opt/jdk-9.0.1/bin/javac"
(The same way you can also set other binaries including javadoc, jshell, jar and javap)
Now the installation of JDK 9 is complete, we can run java and javac command from the Ubuntu command line.
java -version
java version "9.0.1"
Java(TM) SE Runtime Environment (build 9.0.1+11)
Java HotSpot(TM) 64-Bit Server VM (build 9.0.1+11, mixed mode)

javac -version
javac 9.0.1
Compiling and running a Java application
We will run a very simple Hello world program to test our Oracle JDK 9 Installation on Ubuntu.
First, create a file called HelloWorld.java and add following Java Code:
public class HelloWorld {
   public static void main(String[] args) {
      System.out.println("Hello World");
      System.out.println("You have successfully installed Oracle JDK 9 on Ubuntu Linux.");
   }
}
Compile the HelloWorld.java file with javac command:
javac HelloWorld.javaAnd, run the HelloWorld program with java command:
java HelloWorldIf everything is good, the program will print following two lines to the console.
Hello World
You have successfully installed Oracle JDK 9 on Ubuntu Linux.