How to set DNS Servers in Ubuntu 18.04 Linux
It is important to know how to set DNS nameservers in Ubuntu, especially if you are a system administrator working on an Ubuntu server operating system. This tutorial explains how to set DNS server on Ubuntu 18.04, we will cover both Ubuntu server and desktop operating systems.
There are multiple methods for setting DNS nameservers on an Ubuntu Linux, and which method you use depends on which version of Ubuntu you're running. If you are using the Ubuntu server 18.04, you need to add DNS configuration to the interface configuration file. Desktop users need to set DNS server using the NetworkManager graphical configuration tool.
Setting Nameservers on Ubuntu 18.04 Server
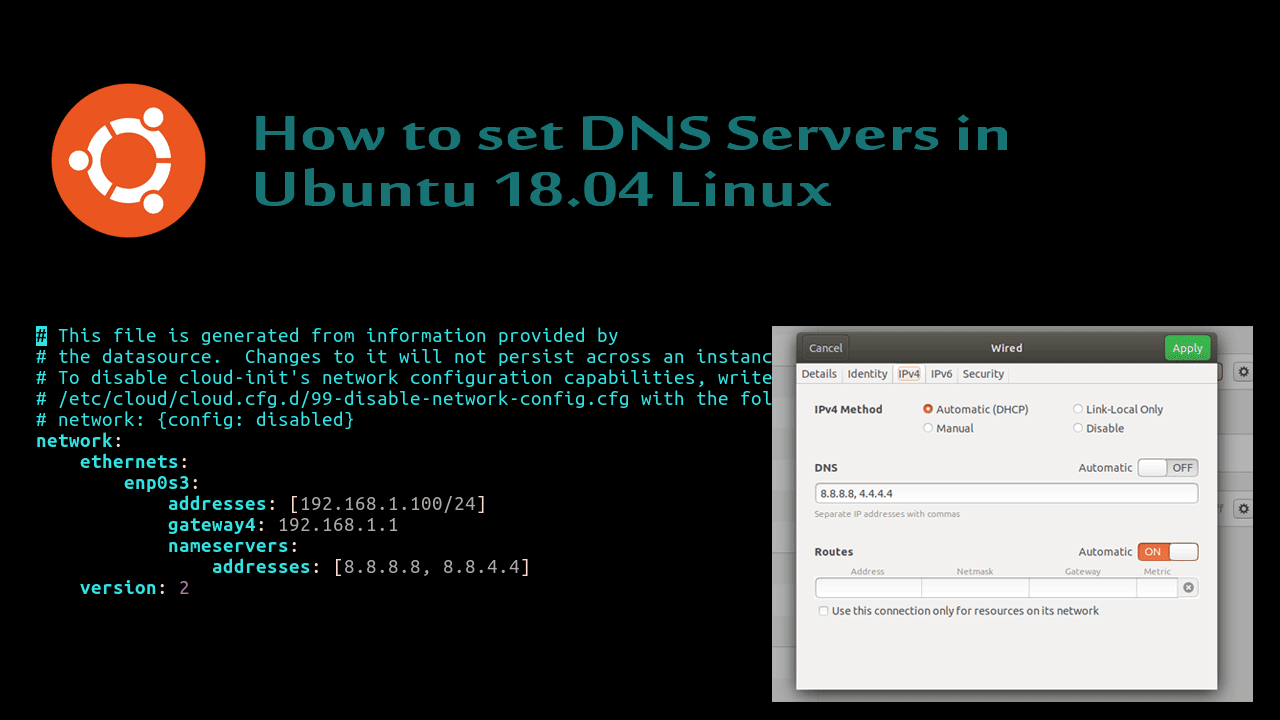
We need to add DNS nameservers to the yaml interface configuration file. You can find the interface file under the /etc/netplan directory. Depends on the install type, name of the config file should be either 50-cloud-init.yaml or 01-netcfg.yaml.

On my server, the file looks like this:

Network interface enp0s3 has been configured with a static IP address and DNS servers has been set to 8.8.8.8 and 8.8.4.4.
nameservers:
    addresses: [8.8.8.8, 8.8.4.4]
Edit this line to match your Name Server. You can add multiple servers, make sure each name server is separated by comma. After you make changes, save the file and reload the configuration with the netplan apply command:
sudo netplan applyNote that, Prior to Ubuntu 18.04, DNS name servers were configured in /etc/network/interfaces file.
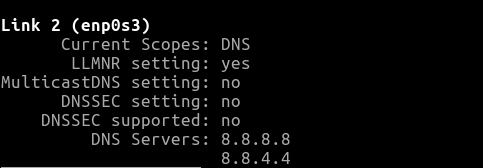
Viewing a server's current DNS assignment
To check what name servers your server is currently using, you could check the Netplan configuration file if static IP addresses being used, otherwise we can run the systemd-resolve command.
systemd-resolve --statusThe systemd-resolve command will let you know what DNS nameservers your server is currently pointing to.
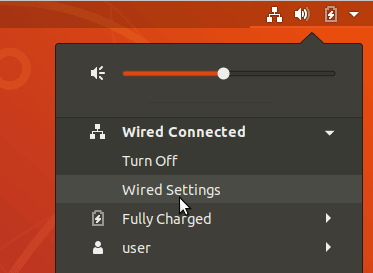
NetworkManager on Ubuntu Desktop
NetworkManager is the service that runs in the background and manages your network connections in Ubuntu desktop distribution. With NetworkManager, to set DNS server, you need to edit the network connection via graphical user interface.
Go to IPV4 tab (or IPv6) add IP Addresses under the DNS field (Turn off automatic DNS if you don't want to assign nameserver from the DHCP server).
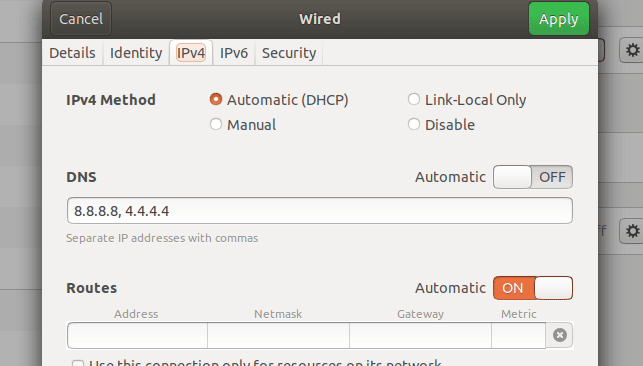
After making changes, you will need to turn off and reconnect the network to apply new settings.
On Ubuntu 16.04 and older versions of Ubuntu, there was a file, /etc/resolv.conf, that was used to configure DNS name servers. Although /etc/resolv.conf still exist on Ubuntu 18.04, it is no longer where you configure your DNS name servers.