How to Create an Ubuntu Server VM on Hyper-V
In this guide, we'll create an Ubuntu Server virtual machine on Hyper-V — from setting up networking to installing the OS and logging in over SSH. This assumes Hyper-V is already enabled on your system. If it isn't, check out our guide on enabling Hyper-V on Windows 11 and Windows Server 2025.
What You'll Need
- Hyper-V enabled on Windows 11 or Windows Server 2025
- An Ubuntu Server ISO (download the 64-bit AMD/Intel package from ubuntu.com)
Step 1: Set Up an External Virtual Switch
Before creating the VM, set up networking in Hyper-V Manager:
- Open Virtual Switch Manager.
- Select New Virtual Network Switch | External.
- Click Create Virtual Switch, name it (e.g., "External Switch 1").
- Select the network interface your host PC uses to connect to the internet.
- Click Apply, then Yes.
An external switch connects your VM to the same physical network as your host PC — unlike the default switch, which uses an internal network type.
Step 2: Create the Virtual Machine
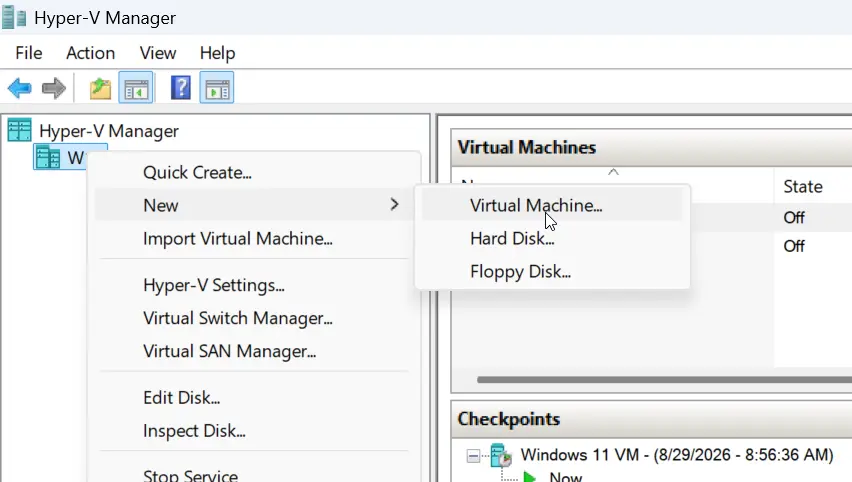
- Right-click the host in Hyper-V Manager | New | Virtual Machine.
- Name it (e.g., "Ubuntu Server 26.04").
- Choose Generation 2.
- Assign RAM (4 GB is enough for Ubuntu Server) and leave Dynamic Memory enabled.
- Select your external switch.
- Create a virtual hard drive | the default 127 GB works fine (it's dynamically allocated, so it won't use all the space right away).
- Select Install an operating system later, then Finish.
Step 3: Configure VM Settings
Before booting, adjust a few settings:
- Right-click the VM | Settings.
- Under Security, change the Secure Boot template from Microsoft Windows to Microsoft UEFI Certificate Authority.
- Under SCSI Controller, add a DVD Drive.
- Attach your Ubuntu Server ISO to the DVD drive.
- Under Firmware, move the DVD Drive to the top of the boot order.
- Click Apply.
Step 4: Install Ubuntu Server
- Right-click the VM | Connect, then click Start.
- At the GRUB screen, select Try or Install Ubuntu Server.
- Follow the text-based installer.
That's it — your Ubuntu Server VM is up and running on Hyper-V. In the next guide, we'll cover how to clone this VM, which is handy for quickly setting up lab environments.