How to Install Apache, PHP and MySQL on Ubuntu 18.04
In this tutorial we are going to learn how to configure Ubuntu 18.04 server as a web server using the Ubuntu LAMP stack, which includes the Apache web server, PHP programming Language and MySQL/MariaDB Database Server.
We will start by installing and configuring Apache web server, then we will install PHP, MySQL Server and phpMyAdmin web interface.
- Install Apache on Ubuntu.
- Install php on Ubuntu.
- Install MySQL Server in Ubuntu.
- Install phpMyAdmin in Ubuntu.
Install and Configure Apache web server on Ubuntu 18.04
Apache is the most popular and stable web server for Ubuntu Linux. The Apache HTTP server for Ubuntu 18 provided by the apache2 package. To install apache2 on Ubuntu, open the terminal and execute:
sudo apt-get update
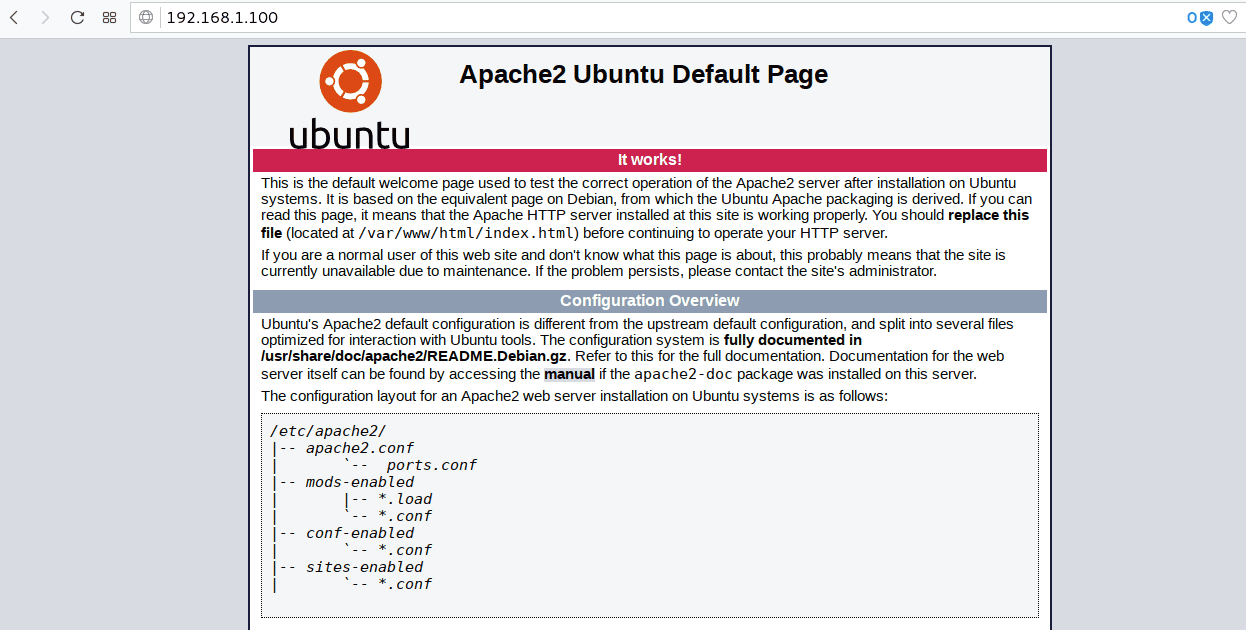
sudo apt-get install apache2That is all you need to do. Now, open a web browser from a remote computer and type the IP address of your Ubuntu server in the address bar.
You will get the Apache2 Ubuntu Default Page.
- The apache2.conf file is the main configuration file which you can find under the /etc/apache2/ directory.
- The /var/www/html is the default DocumentRoot, You can immediately serve static HTML website by putting the contents (e.g. HTML, images, CSS, JavaScript and etc.) into the /var/www/html directory.
Creating Apache Virtual Hosts
Virtual Hosting are a way of serving multiple websites from a single server. Every website will have their own configuration and separate Document Root to host website contents.
Creating an Apache Virtual Host is a simple task. For this demonstration, I am going to create a new virtual host for the example.com domain. The /var/www/example.com directory going to be the DocumentRoot.
First create the DocumentRoot:
sudo mkdir /var/www/example.comCreate the Virtual Host configuration file inside the /etc/apache2/sites-available/ folder (Filename must end with '.conf' extension).
sudo vim /etc/apache2/sites-available/example.com.confAdd following VirtualHost configuration:
<VirtualHost *:80>
  ServerName www.example.com
  ServerAlias example.com
  DocumentRoot /var/www/example.com
  ErrorLog ${APACHE_LOG_DIR}/error.log
  CustomLog ${APACHE_LOG_DIR}/access.log combined
</VirtualHost>
Save the file, enable the new site and reload the Apache web server:
sudo a2ensite example.com.conf
sudo systemctl reload apache2
And now our web server is ready to serve www.example.com website. Of Course we still don't have anything in our DocumentRoot and you also need to configure DNS records to point your domain name to the server IP address.
To test virtual host without DNS, create an index.html file inside the DocumentRoot and entry to the hosts file on your local computer, pointing www.example.com to your Ubuntu server IP address.
Install PHP programming Language
PHP is a programming language for developing web applications and essential part of the Ubuntu LAMP Stack. To install PHP on Ubuntu 18.04, Run:
sudo apt-get update
sudo apt-get install php
The php package will install the "php7.2" as well as "libapache2-mod-php7.2" module that required to work with Ubuntu Apache web server.
After the installation is complete, we need to restart the apache server:
sudo systemctl restart apache2.serviceTo test the PHP installation, create an index.php file under the /var/www/html folder and add the phpinfo() function:
<?php
phpinfo();
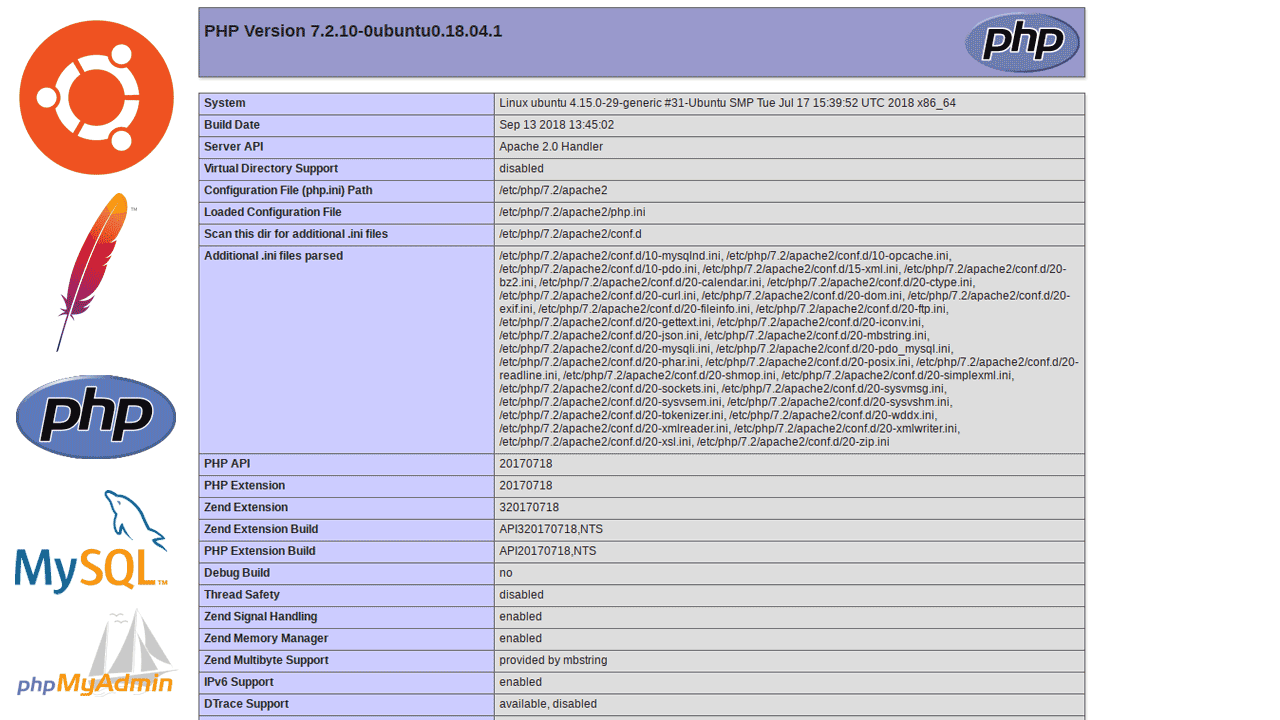
?>Then access the index.php by typing http://your-server-ip/index.php in the web browser (e.g. 192.168.1.100/index.php). You should get information page that displays PHP configuration settings on your Ubuntu 18.04 Server.
Install MySQL Server on Ubuntu 18.04
Next, we are going to install MySQL Server as our Database server. Installing MySQL Server on Ubuntu 18.04 is straightforward. Open the terminal update the package list and install the mysql-server package:
sudo apt-get install mysql-server(If you want to Install MariaDB, install the mariadb-server package instead of mysql-server package).
After the installation has finished, Log in to the MySQL console with the following command:
sudo mysqlNote that the MySQL server on Ubuntu use auth_socket plugin to authenticate mysql root and does not need a password for connecting as a root user. If you want to enable password authentication, click on the following link to learn how to set the MySQL root password on Ubuntu 18.04.
Install phpMyAdmin on Ubuntu 18.04
phpMyAdmin is a web based graphical user interface to manage MySQL/MariaDB Database server. To install phpMyAdmin on Ubuntu 18.04 Server, Run:
sudo apt-get update
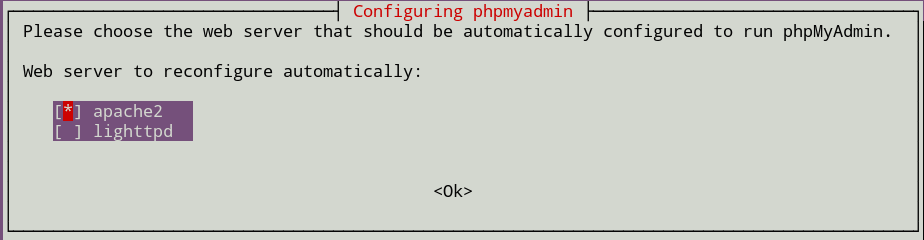
sudo apt-get install phpmyadminWhen asked to choose web server that should be automatically configured to run phpMyAdmin, select apache2 by pressing the space bar on the keyboard.
After the installation completes, you can access phpMyAdmin at http://server-ip/phpmyadmin or http://domain-name/phpmyadmin.
Now you have a fully functional web server up and running with Apache, MySQL and PHP programming language.
Summary
In this tutorial we learned how to install Lamp stack on Ubuntu 18.04 server. The LAMP stack stands for Linux Apache MySQL and PHP, it is a web hosting platform for Linux to server web pages using http protocol.
What Next? Next we are going to learn how to install vsftpd on Ubuntu 18.04. You can also read our WordPress installation guide, WordPress is the most popular content management system and most of websites on the internet is powered by WordPress.