Windows Grep Command – Examples and How To Install
In this tutorial, we will learn how to install the grep command on the Windows operating system. We will then look at a few examples to learn how to search for text patterns with the grep command.
After you install grep on Windows, you can use it on both CMD and Windows PowerShell. You can pipe CMD and PowerShell commands to the grep to filter the output.
Install Grep on Windows
There are a couple of ways to install grep on Windows. The easiest way is to install git using the winget package manager.
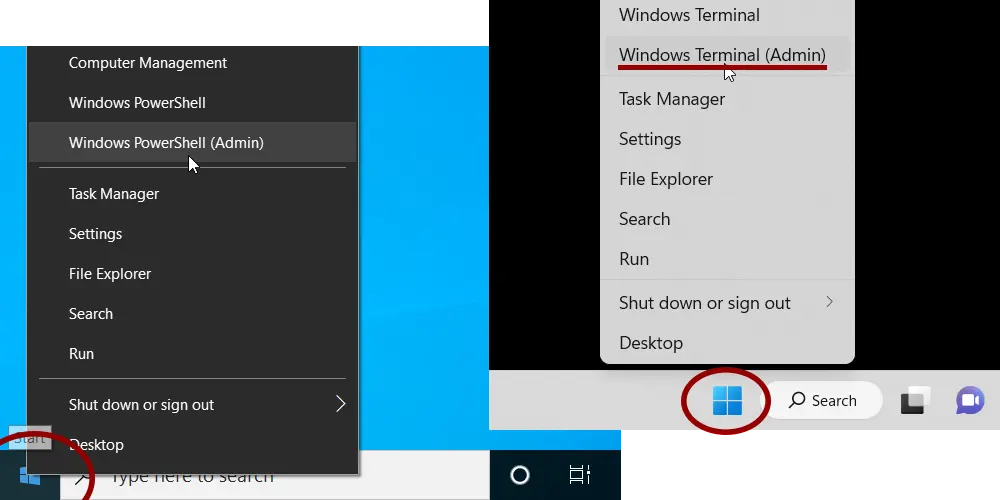
To get started, start an Administrator console: Right-click the Start button and choose Windows Terminal (Admin) if you are on Windows 11 or PowerShell (Admin) if you are on Windows 10.
Execute the following command to install Git:
winget install --id Git.Git -e --source wingetNext, run the following command to add the bin directory to the system PATH variable:
$PATH = [Environment]::GetEnvironmentVariable("PATH", "Machine"); [Environment]::SetEnvironmentVariable("PATH", "$PATH;C:\Program Files\Git\usr\bin", "Machine")After that, exit and re-open the PowerShell console. And that is it. The grep command is now available in both CMD and Windows PowerShell.
If for some reason, you don't like to install Git Bash, there is an alternative. That is to install grep using the chocolatey package manager. You can do that by running the following two commands:
Set-ExecutionPolicy Bypass -Scope Process -Force; [System.Net.ServicePointManager]::SecurityProtocol = [System.Net.ServicePointManager]::SecurityProtocol -bor 3072; iex ((New-Object System.Net.WebClient).DownloadString('https://chocolatey.org/install.ps1'))
choco install -y grep
This will only install the grep command. The Git Bash package installs other Linux command-line tools such as awk, sed, and find under the C:\Program Files\Git\usr\bin directory.
Grep Command Examples
There are two ways to use grep. First, grep can be used to search strings on one or more files. Second, grep can be used to filter the output of another command.
In the following section, we will go through a number of examples to learn the grep command.
Basic Text Searching
In its basic form, we use the grep command to search strings in files and grep prints lines that match.
grep 'string' filenameYou can search on multiple files at once if you want:
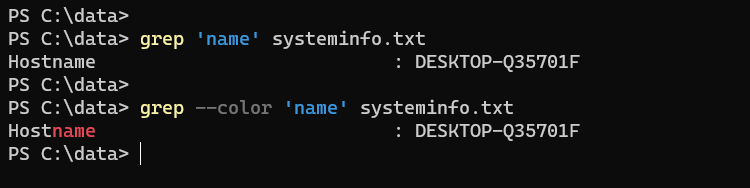
grep 'string' file1 file2 file3In the following example, we search for the string 'name' in the text file called systeminfo.txt:
grep 'name' systeminfo.txtThe command will display lines that contain the given string anywhere in it. You can add the --color option to colorize the matching pattern in the output.
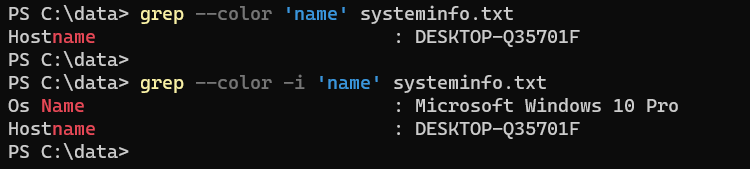
Windows grep command is case-sensitive. Use the -i option to ignore capitalization:
grep -i 'name' systeminfo.txtThe -i option, you will use it more often than not.
Important: Always put the search string inside quotes. Especially if there are spaces in your search.
Below you will find the most basic search options you should know about.
| -i | Ignore the case. |
| -n | Print line numbers. |
| -v | Display non-matching lines. |
| -c | Print line count. |
| -w | Match only whole words. |
| -x | The entire line should match. |
| -o | Prints only the text that matches instead of the entire line. |
| -a | Read binary files as if they are text files. |
| -f | Take search strings from a file. |
| -e | Specify multiple patterns. |
| --color | Colorize the search pattern in the output. |
Using -n to display the line number of the matching line:
grep -in 'windows' systeminfo.txtUsing the -v option to display lines that do not match:
grep -iv 'windows' systeminfo.txtIn the following example, we are using -v and -c options to count all the lines that do not contain Windows:
grep -ivc 'windows' systeminfo.txtIf you want to search more than one pattern, use the -e option as shown in the following example:
grep -i -e 'name' -e 'win' systeminfo.txt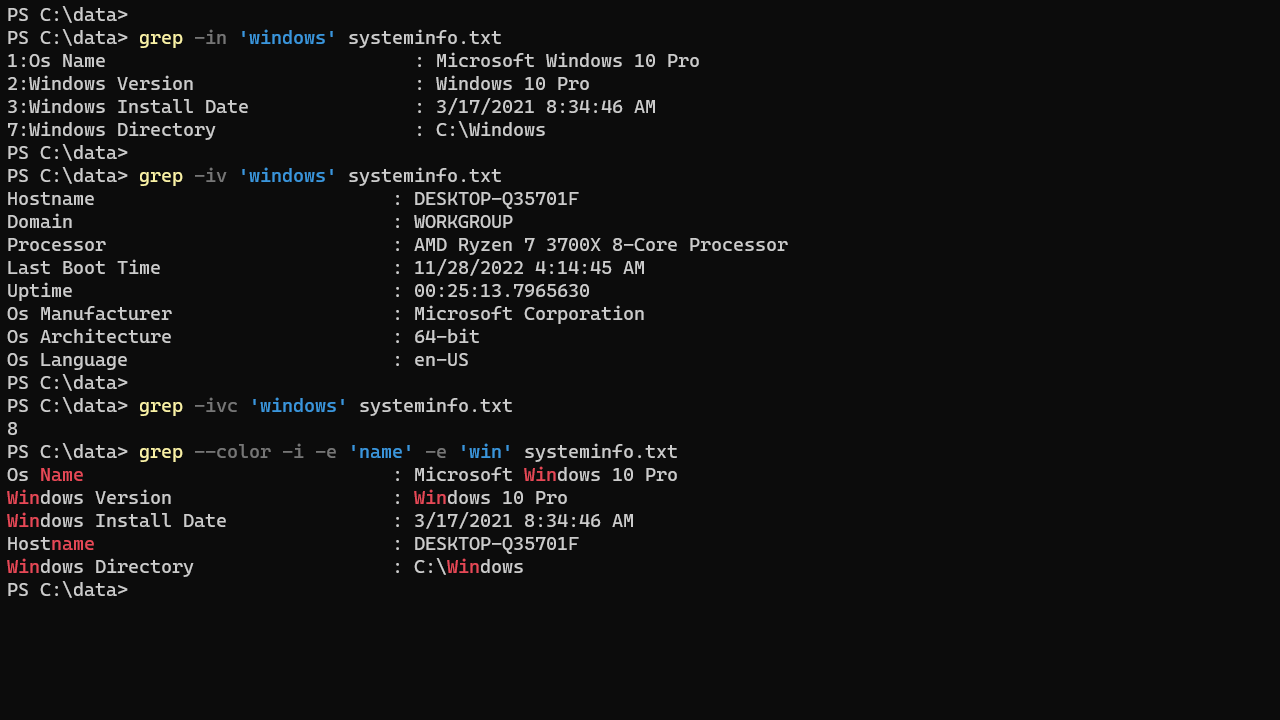
Send Output From Another Command
As a system administrator, most of the time, you will use the grep command to filter the output of another command.
tasklist | grep -i explorerIn the previous example, the output of the tasklist command is piped into the grep command, which will then display only those lines that contain the string explorer.
You can also use grep to filter PowerShell commands:
Get-ComputerInfo | grep -i 'network'It is also possible to chain grep commands together any number of times, as shown in the following example:
tasklist | grep -i 'exe' | grep -i 'service'Recursive Search
Using the -r option, we can search for a particular string throughout all files in a directory or entire filesystem.
grep -i -r 'error' C:\Windows\Logs\The preceding command finds all instances of error in all files under the C:\Windows\Logs\ and its subdirectories.
Add the -l option to the previous command, and it prints only the names of files.
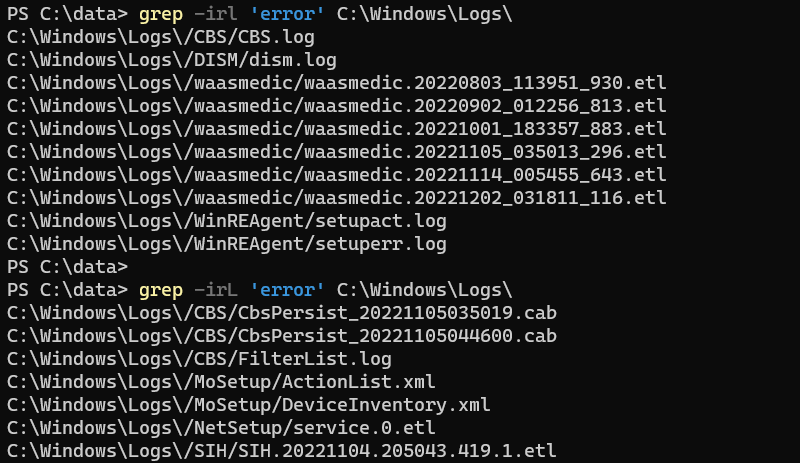
grep -irl 'error' C:\Windows\Logs\The -L (uppercase) does the opposite. It prints the names of files containing no match.
To include or exclude a file pattern, use --include or --exclude options, respectively.
grep -ir 'error' C:\Windows\Logs\ --include=*.log
grep -ir 'error' C:\Windows\Logs\ --exclude=*.log
In the above example, the first command searches the given string on all files with the .log extension, while the second command searches all files except the ones that end with the .log extension.
| -r | Search for matching files under each directory recursively. |
| -R | Search for matching files under each directory recursively. Follow all symbolic links, unlike -r. |
| -l | Display only the names of files with matching lines. |
| -L | Display only the names of files with no matching lines. |
| --include=GLOB | Search only files that match a file pattern. |
| --exclude=GLOB | Skip files that match a file pattern. |
Metacharacters
As a system administrator, you should be familiar with a few important regular expressions for advanced text searching.
The asterisk(*) is by far the most commonly used metacharacter. In the following example, we filter the output of the systeminfo command to find any occurrence of 'pro' followed by any number of characters.
systeminfo | grep -i 'pro*'Positional Searching
The grep command has metacharacters that we can use to search patterns at the start and end of a line and the start and end of a word.
| ^ | Find the pattern at the start of the line. |
| $ | Find the pattern at the end of the line. |
| \< | Find the pattern at the start of a word. |
| \> | Find the pattern at the end of a word. |
| \s | Any whitespace character. |
Examples
Search for the lines starting with Windows:
grep -i '^windows' systeminfo.txtSearch for the lines that end with Windows:
grep -i 'windows$' systeminfo.txtFind the lines that have words starting with the letters 'ver':
systeminfo | grep --color -i '\<ver'Find the lines that have words ends with the letters 'ver':
systeminfo | grep --color -i 'ver\>'Find Windows surrounded by whitespace:
grep -i '\swindows\s' systeminfo.txt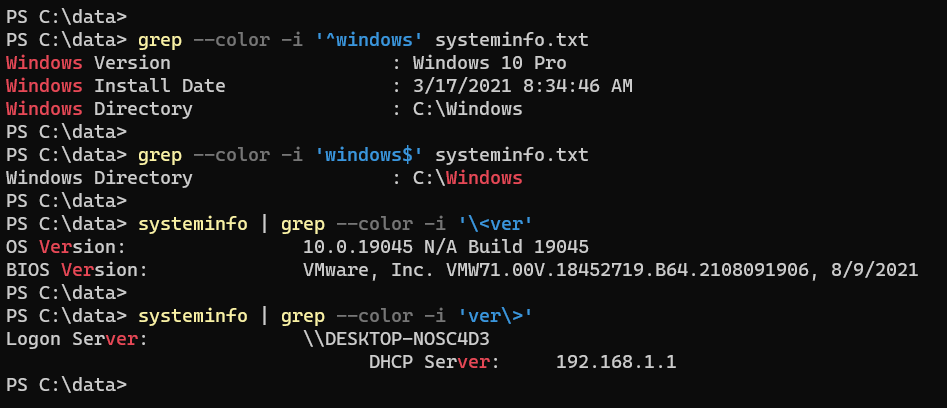
Escaping Metacharacters
If a meta character (for example, the dollar sign) is part of the string, you need to escape it with a black slash (\).
For example, let's say you are searching for an amount that contains the dollar sign. Since the dollar sign is a metacharacter, you need to escape it with a black slash to make it part of the string:
grep '10\$' systeminfo.txtGrep comes with a handful of options that control the way it displays the results. To view information on all available options, type grep --help.
Windows Command Prompt also has a text search tool called findstr, which is very similar to the grep command.